Silage Management
The journey to producing high-energy, high-protein, and highly digestible silages starts long before the silage season begins. Key decisions such as selecting the right grass seed mixture, determining sward age, choosing whole crop types, selecting the right maize maturity, establishing a fertiliser and slurry management plan, considering topography, and deciding whether to include clover, all play a vital role. Additionally, proper forager maintenance and other factors must be considered.
In this section, we will address common questions related to silage cutting, ensiling, sealing, and feed-out, while also offering valuable insights into the key management decisions that will help you optimise the ensiling process for your forage.
Key goals for achieving high-quality silage include:
- Ensuring a rapid pH drop to between 3.8 and 4.2, tailored to the ensiled forage type and dry matter (DM) content.
- Facilitating a controlled fermentation process to minimise nutrient loss and maximise DM intake for livestock.
- Preventing spoilage by managing the presence of natural bacteria, molds, and yeasts.
- Producing silage that is well-preserved, nutritious, and palatable.
- Maintaining cool, aerobic stability as long as possible once the silage is opened.
Ideally, you should have a target cutting date, a record of nutrient application rates, and predicted usage calculations for both organic and inorganic fertilisers. A fresh grass analysis can further support your planning by confirming fertiliser residues in the grass (aim for ammonia nitrogen levels below 15% of total nitrogen), assessing sugar availability for optimal fermentation (at least 3% for good fermentation), and providing fiber content (aim for NDF below 45%) to gauge digestibility.
Beyond these immediate benefits, a grass analysis is also an excellent tool for guiding future nutrient applications and assessing soil nutrient availability.
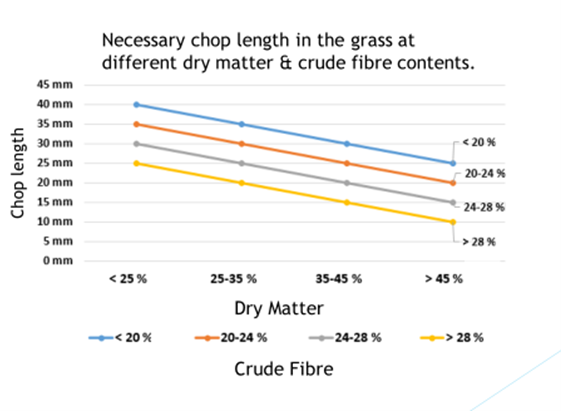
Forage chop length should primarily be based on the crop’s dry matter (DM) and fiber (NDF) content. You can easily refer to the chart below for guidance on chop length for grass silages.
For maize silage, however, a chop length of 10-15mm is essential to ensure proper compaction. If chop length exceeds 20mm at the target DM of 30-35%, achieving adequate consolidation in the clamp becomes challenging.

Cutting early is often the best approach, as delaying harvest can compromise the quality of subsequent cuts. However, if you plan to cut before your intended date, it's important to analyse your grass for residual nitrogen, as high nitrogen levels can negatively impact fermentation quality. As a general guideline, set an intended cutting date and adjust your nitrogen applications to 3 days before that date. This will create a wider window for cutting, reducing the risk of high nitrate nitrogen levels in the forage. The target for nitrate should be below 0.12% of fresh matter.
While it may be tempting to wait for higher sugar levels and cut grass for silage in the afternoon, it’s generally best to start cutting as soon as the morning dew lifts. For lighter, multi-cut systems, cut early, spread the swath within one hour (ideally at cutting), and allow the crop to wilt as quickly as possible to reach 30% DM. Aim to lift the crop the same day to minimise field DM losses. If harvesting on the same day isn’t possible, keep wilting time brief—ideally under 24 hours—to reach target DM, as prolonged wilting leads to sugar loss through respiration, reducing sugars needed for fermentation and lowering silage energy.
Aim for a realistic DM of 28–33%. If weather or conditions require ensiling at less than 28% DM, be mindful of the challenges in producing enough lactic acid to sufficiently reduce pH and preserve silage. In wetter silages, you may see low sugar levels, yet high lactic acid levels, which can contribute to subacute ruminal acidosis (SARA). For silages below 25% DM, there is a higher risk of undesirable butyric (clostridial) fermentation, so consider using a homofermentative inoculant with strong lactic acid-producing bacteria to prevent spoilage.
Absolutely! As the crop matures, fiber content increases, raising the NDF and ADF levels, which in turn lowers the D-value and metabolizable energy (ME). The D-value is a key driver of silage nutritional quality and directly impacts intake potential. Grass D-value can decrease by up to three points for each week harvest is delayed—meaning that silage with a D-value of 72 can drop to 69 in just one week!
The target dry matter (DM) for grass silage is 30%. This level is optimal because it minimises DM losses from respiration, fermentation, and potential effluent seepage during harvest. At 30% DM, these loss factors are minimised, providing the best conditions for preserving silage quality.
For maize silage, the target is 30-35% DM. This range balances the maturity of both the plant stem and starch. Below 30% DM, the stem is still green and moist, with starch in a milky or doughy state, which can lead to nutrient loss. At 30-35% DM, the stem starts yellowing at the base, increasing NDF, while the starch reaches a doughy to hard consistency, reducing the risk of leaching. Above 35% DM, the crop begins to dry out, making compaction difficult and reducing the digestibility of leaves and stems.
In short, the higher the silage density, the better the preservation. Aim for a pit density of at least 750 kg fresh weight per cubic meter (225 kg DM/m³), which can be achieved through effective clamp filling and packing.
As a rule of thumb, the packing machinery weight should be equal to the forage delivery rate (t/hr) multiplied by 0.25. Keep in mind that a self-propelled harvester can deliver over 100 tonnes of silage per hour to the clamp. To achieve optimal density, spread the forage in 20 cm layers from front to back, and ensure the slope never exceeds 30 degrees.

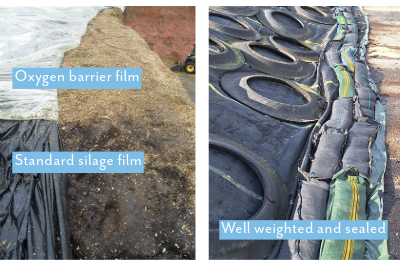
Sealing the clamp is absolutely critical! The goal is to create an "anaerobic" (air-free) environment to ferment fresh forage into silage. Any exposure to oxygen will hinder the efficiency of anaerobic bacteria and increase the risk of unfavorable fermentation. If you can see your silage cover moving in the wind, it means the seal isn't intact—it's essentially just an umbrella! Proper sealing means ensuring that tyres, gravel bags, or tyre walls (whatever you use) are in contact with the cover along the entire perimeter, blocking any air ingress.
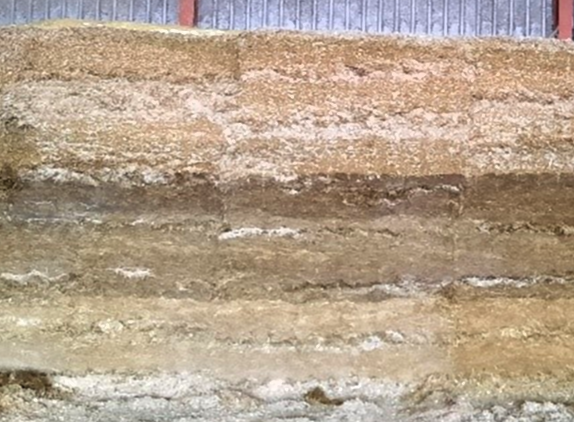
The type of film used to seal the clamp is also crucial. Many standard silage films are permeable to air to a greater or lesser degree, which is why you often find a layer of rotted silage on top when the clamp is opened. To prevent this, consider using an Oxygen Barrier (OB) film, which significantly improves silage quality.
A meta-analysis by Wilkinson & Felon comparing standard polyethylene films to OB films found that OB films reduced outer layer losses from 19.5% to 11.4%, decreased inedible silage from 10.7% to 2.96%, and improved aerobic stability from 75.3 hours to 134.5 hours. So, it’s worth investing in a reputable oxygen barrier film for optimal silage preservation.

Shrinkage refers to the “settling” of the silo, resulting from the loss of digestible nutrients, typically in the outer 0.5 meters or top layer of the silage. This shrinkage indicates invisible energy losses in the form of CO₂ and H₂O, leaving behind inedible material that must be discarded.
This invisible loss represents an economic loss too, as valuable yield is lost post harvest.
The target pH of your silage will depend on the type of forage, dry matter (DM) content, available water-soluble carbohydrates (WSC sugars), native bacteria, acid profiles, and any inoculants used. The pH should start dropping within hours of ensiling and reach the target range (3.8–4.2) within a few days, with faster pH reduction preserving more valuable sugars and protein.
Lactic acid production is crucial for lowering the pH, as approximately 7.5% lactic acid content typically brings grass silage to around pH 4–4.2. (Note: the “buffering capacity” of the forage may impact this, which we'll discuss further below.) Using an inoculant can help achieve a faster, more energy-efficient fermentation.
The target D-value for silage depends on the type of animals you plan to feed. For high-yielding or high daily live weight gain (DLWG) animals, a D-value of ≥72% is ideal. This is primarily influenced by the maturity of the crop at cutting. A lower NDF combined with a higher D-value allows for greater silage dry matter intake, leading to higher energy consumption from the forage.
The desired metabolisable energy (ME) content of silage is dependent on the type of animals being fed. For high-yielding or high daily live weight gain (DLWG) animals, an ME of 11.5 MJ/kg DM is ideal. The key recommendation is to avoid sacrificing quality for quantity. Set target cutting dates and apply slurry and fertiliser strategically to produce silage that meets your specific ME goals, while considering your farm’s conditions and sward type. Cutting early first-cut silage allows subsequent cuts to have greater potential for higher energy content, especially if cuts are made 4-5 weeks apart.
A sensible crude protein (CP) target for grass silage is 16-18% (180g/kg DM), which can be theoretically calculated based on the nitrogen removed per hectare. You can estimate this using the formula: (180/6.25) x DM yield in t/ha. However, several factors impact CP content long before silage is made, including sward quality, sulphur fertiliser use, and timing of fertiliser application.
Another key consideration is whether the nitrogen in your silage is true protein or unused nitrogen (non-protein nitrogen, or NPN). While a small amount of residual nitrogen is acceptable, excessive NPN will consume energy, convert to ammonia, and buffer against pH decline, leading to poor fermentation in the clamp. It’s important to note that CP analysis doesn’t distinguish between true protein and NPN—so the crude protein value reflects the total nitrogen multiplied by 6.25, not just the true protein content.
Effective feed-out management means controlling as much as possible when the silage clamp is exposed to air, as silage stability decreases once it’s opened. Only remove the necessary amount of oxygen-barrier film for feed-out, sealing the edge tightly to prevent air from entering. The goal is for the feed-out rate to exceed any rate of air infiltration, which largely depends on the initial packing and sealing quality.
Keep the silage face cut perpendicular to the clamp floor, minimising the surface area exposed to air. Air can penetrate up to 1 meter behind the face, especially in high-DM silages, allowing yeasts to consume valuable sugars and lactic acid. Using an inoculant that produces both lactic acid (for pH drop) and acetic acid (to inhibit yeast) is beneficial. Lower-DM silages consolidate more easily, reducing the risk of air ingress during feed-out.
Using a silage inoculant is highly recommended for several key reasons, primarily to protect the investment in the silage you’ve worked hard to produce. During the initial ensiling phase, an inoculant helps lower the pH much faster than native bacteria. The inoculant’s bacteria should outcompete native bacteria, ensuring a more predictable fermentation process. At the final stage, when opening the silage, an inoculant can offer stability through the acetic acid produced earlier, which helps kill yeasts in the silage, reducing energy losses that could occur due to heating.
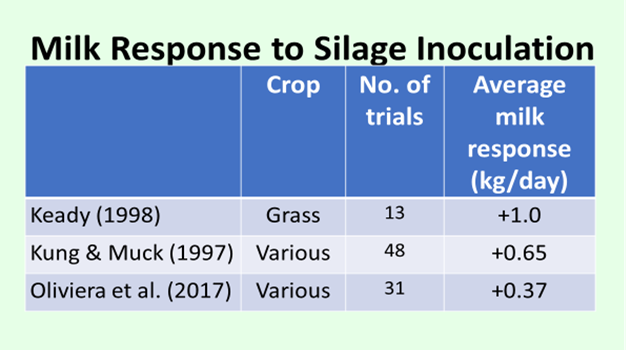
It’s important to prioritise treating your best silages, as any percentage loss in high-quality silage represents a larger economic impact than losses in poorer silages. In the UK and Ireland, most silage is not treated with an inoculant, with many farms considering it an unnecessary cost. However, ongoing trials have consistently shown the financial benefits of inoculants , particularly in terms of milk yield (see table below). The reduced losses, often unmeasured and unnoticed, also contribute to better overall silage quality. Much like milk recording, if you don’t measure, you won’t see the difference!

Absolutely, silage inoculants are safe and regulated! This is because every strain or combination of Lactic Acid Bacteria (LAB) used in silage inoculants must undergo rigorous testing and approval by the European Food Safety Authority (EFSA). The EFSA evaluates the safety, efficacy, and potential for antibiotic resistance of each strain.
All EFSA-registered LAB inoculants are tested at their recommended Colony Forming Units (CFUs) to ensure their effectiveness and safety. The required CFU count can range from 50,000 to 1 million CFUs, depending on the specific strain and formulation. As long as the CFU count conforms to EFSA-approved standards, the inoculant is both safe to use and effective in achieving the desired fermentation outcomes in silage.
No, an inoculant cannot create energy or protein. Its primary function is to preserve and protect as much of the energy and protein in your silage as possible. It achieves this by aiding the fermentation process, helping to convert water-soluble carbohydrates (grass sugars) into beneficial acids, which ensures better preservation of the silage’s nutritional value.
Clostridia can cause significant losses in silage quality, as these bacteria not only consume water-soluble carbohydrates (WSCs) but also lactic acid, proteins, and amino acids. They produce butyric acid during a highly wasteful fermentation process, resulting in a loss of about 20% of the silage’s energy. Clostridial bacteria thrive in wet silages (below 25% DM) and when the pH is above 4.5. Other conditions, such as high buffering capacity and low WSCs, further promote their growth, but the primary source of clostridia is soil and slurry contamination, often linked to wet harvest conditions and subsequent forage contamination.
Soil contamination is typically reflected in silage analysis as ash, with a target of less than 10% in the DM. Since clostridia require moisture to grow, wilting is a key tool in preventing their proliferation. If wilting is not possible, consider using a proven inoculant to protect your low-DM forages in the clamp.
Buffering capacity refers to the resistance of silage to changes in pH. Since we want the pH to drop quickly during fermentation, a high buffering capacity can present a challenge. Factors that contribute to a high buffering capacity include the crop type (legumes are more resistant to pH changes than grasses), high ash content (often due to soil contamination), and low-DM silages.
The lactic acid bacteria in the crop work hard to convert water-soluble carbohydrates (WSCs) into lactic acid. However, once the sugars are depleted, if enough lactic acid is produced, the pH can drop significantly, often resulting in very acidic silage, which can contribute to conditions like Subacute Ruminal Acidosis (SARA).
Some silage inoculants are proven to combat clostridia in silages and should be considered when making high-legume silages or when working under wet or challenging conditions.
Both Homofermentative and Heterofermentative lactic acid bacteria (LAB) are used in silage inoculants to achieve specific fermentation outcomes, tailored to the crop type and its dry matter (DM) content.
Homofermentative LAB convert water-soluble carbohydrates (WSCs) into lactic acid only, which effectively reduces the pH, as desired.
Heterofermentative LAB, depending on the strain, can:
- Convert some of the lactic acid into acetic acid, which inhibits yeasts and moulds, especially in aerobic conditions.
- Produce both lactic and acetic acids, accelerating the fermentation process and resulting in quicker production of beneficial acids, minimising energy losses.
- Produce by-products like propylene glycol, which can be beneficial during fermentation.
For low-DM forages, it's essential to have Homofermentative LAB as the dominant strain, as they help overcome higher buffering capacity by producing lactic acid. For higher-DM forages, the inclusion of Heterofermentative LAB helps produce acetic acid, which can prevent heating during feed-out.
If Heterofermentative LAB is used, it should always be combined with at least one Homofermentative strain to ensure that lactic acid is produced, avoiding reliance on native bacteria. The goal is a predictable fermentation process, and this may be compromised if you rely solely on native bacteria instead of a dominant inoculant-derived LAB.
Yes, that’s correct! During the conversion of lactic acid to acetic acid by certain Lactic Acid Bacteria (LAB), a by-product called 1,2 propanediol (also known as Propylene Glycol, or PG) is produced. PG is widely used in the dairy industry as a prophylactic treatment against ketosis in cows.
Under optimal fermentation conditions, grass silages can contain 2-3% PG of the dry matter (DM). However, it’s important to note that PG is not an additional source of energy in the silage. Like lactic acid and acetic acid, PG is derived from the water-soluble carbohydrates (WSCs) in the forage and is simply an alternative form of energy. Once ingested by cows, PG serves as a precursor that the animal can convert into glucose, supporting its energy needs.
Biogas Additives
Using the right additives in biogas plants is essential for enhancing environmental performance, operational efficiency, and financial returns.
Effective additives improve the breakdown of organic material, maximising biogas yield while reducing waste output. This increased efficiency lowers greenhouse gas emissions and minimises the need for additional feedstock, which contributes to a more sustainable and environmentally friendly operation. Financially, additives boost overall profitability by optimising gas production, cutting down on maintenance costs, and increasing equipment lifespan.
To maximise efficiency in biogas plants, several key goals should be prioritised:
-
Optimising Biogas Yield: Maximising gas production from available feedstock is crucial. This involves selecting and pre-treating substrates to increase microbial breakdown, using additives to enhance digestion, and maintaining an ideal mix of feedstock for stable, consistent gas production.
-
Maintaining Process Stability: Biogas production is sensitive to pH, temperature, and nutrient balance. Maintaining these factors within optimal ranges helps prevent process disruptions and ensures a stable environment for methane-producing bacteria, which directly affects biogas output.
-
Reducing Maintenance and Downtime: Keeping equipment clean and functioning smoothly minimises downtime. Regular monitoring and preventive maintenance, alongside the use of anti-corrosion and anti-foam agents, help extend equipment life and reduce the risk of costly repairs or replacements.
-
Minimising Waste and Emissions: Efficient biogas plants reduce waste by converting more organic matter into biogas, resulting in lower emissions of methane and other greenhouse gases. Effective waste management also reduces odors and improves the plant's environmental impact.
-
Increasing Financial Return: By maximising gas yield, reducing operating costs, and improving system reliability, biogas plants can enhance profitability. This includes optimising energy recovery for use on-site or for sale, which directly improves the plant's economic viability.
In this FAQ section, we’ll cover the key benefits and considerations for choosing the right biogas additives to help you get the most out of your plant.
OLIGAS trace elements are a customised blend of essential trace elements, carefully formulated to support the specific needs of your digester. They play a crucial role in enhancing microbial resilience and maintaining stable biogas production. By supplementing the digester with these tailored trace elements, OLIGAS helps achieve two main objectives:
-
Strengthening Microbial Health: The added trace elements make the microbes in your digester more robust, ensuring a smoother, more consistent production of biogas. This stability helps prevent sudden drops or "crashes" in gas output, even when operational demands fluctuate.
-
Increasing Feedstock Flexibility: OLIGAS enables the safe use of challenging feedstocks, like poultry litter and other high-nutrient materials that might otherwise disrupt the digester’s balance. This flexibility opens up new possibilities for feedstock choice, increasing efficiency and potentially lowering input costs.
With these benefits, OLIGAS trace elements not only help optimise biogas yield but also contribute to a more resilient and cost-effective digestion process.
METHOgas is a patented additive that harnesses the power of electrically charged polyamines to boost the efficiency of your digester. By enhancing enzyme activity, METHOgas supports the breakdown of fibrous materials, allowing for a more thorough digestion process. This not only improves fiber digestion but also stimulates methanogenic bacteria, leading to increased gas production.
With METHOgas, you can achieve greater biogas output by maximising the digestion of feedstocks, contributing to a more efficient and productive biogas system.
METHOFILTER is an innovative alternative to activated carbon for removing hydrogen sulphide from biogas. One major advantage of METHOFILTER is its recyclability within the digester: instead of incurring disposal costs, you can simply add the used METHOFILTER back into the biomass feeder. This approach not only eliminates disposal expenses but also allows for the recovery of any remaining active components, reducing the need for additional iron supplementation.
Yes, in fact it’s even safe to operate a digester using only poultry litter as a feedstock. With the right products and expert guidance, you can significantly increase the proportion of high-nitrogen materials like poultry litter without the need for costly ammonia extraction technology. Our solutions are designed to help stabilise the digestion process, making it efficient and manageable, even with challenging, nitrogen-rich feedstocks.
Realistic Agri Ltd. has been a trusted supplier to the anaerobic digestion (AD) market for nearly 20 years. In partnership with Italy-based Methodo Chemicals, we provide access to scientifically proven products and a dedicated team of four biogas biologists who support over 600 digesters throughout Europe. With this extensive expertise and collaborative approach, we deliver reliable, high-performance solutions to optimise AD plant efficiency and productivity.